一般使用代码创建邮件不会是简单的纯文本邮件,在使用Java代码创建基于HTML的电子邮件内容非常繁琐且容易出错,而且更改电子邮件内容的显示结构需要编写Java代码,重新编译,重新部署
使用模板可以解决这些问题,使用模板库如FreeMarker、Velocity、Thymeleaf来定义电子邮件内容的结构,从 Spring 4.3 之后,Velocity支持已被弃用。
1.1. 使用 FreeMaker 模板创建邮件
1.1.1. 添加依赖
<dependency>
    <groupId>org.springframework.boot</groupId>
    <artifactId>spring-boot-starter-freemarker</artifactId>
</dependency>
1.1.2. 添加配置
#默认模板文件路径为classpath:/templates/
#spring.freemarker.template-loader-path=classpath:/templates/
#spring.freemarker.settings.template_update_delay=1800
#spring.freemarker.settings.default_encoding=UTF-8
#spring.freemarker.settings.locale=zh_CN
1.1.3. 邮件模板文件
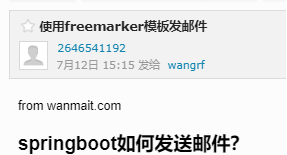
创建question.ftl文件放在resources下面的templates文件夹下:
<!DOCTYPE html>
<html lang="en">
<head>
    <meta charset="UTF-8">
    <title>Title</title>
</head>
<body>
<span>from wanmait.com</span>
<h2>${question.title}</h2>
<p>${question.info}</p>
</body>
</html>
1.1.4. 邮件发送类
@SpringBootTest
public class MailTest {
    @Resource
    private MailUtil mailUtil;
    @Resource
    private FreeMarkerConfigurer freeMarkerConfigurer;

    @Test
    public void testSendFreeMarkerMail() throws IOException, TemplateException {
        Question question = new Question();
        question.setTitle("springboot如何发送邮件?");
        question.setInfo("springboot能不能使用模板来发送邮件?");

        //准备模型数据
        Map<String, Object> model = new HashMap<>();
        model.put("question", question);
        //获取模板
        Template template = freeMarkerConfigurer.getConfiguration().getTemplate("question.ftl");
        //渲染模板生成字符串
        String text = FreeMarkerTemplateUtils.processTemplateIntoString(template, model);
        //渲染模板输出到文件
        //template.process(model,out);
        System.out.println(text);
        //发送邮件
        mailUtil.sendMail("wangrf@qingsoft.net", "使用freemarker模板发邮件", text);
    }

}
1.2. 使用thymeleaf模板创建邮件
1.2.1. 添加依赖
<dependency>
    <groupId>org.springframework.boot</groupId>
    <artifactId>spring-boot-starter-thymeleaf</artifactId>
</dependency>
1.2.2. 添加配置
#默认模板文件路径为classpath:/templates/
#spring.thymeleaf.prefix=classpath:/templates/
1.2.3. 邮件模板文件
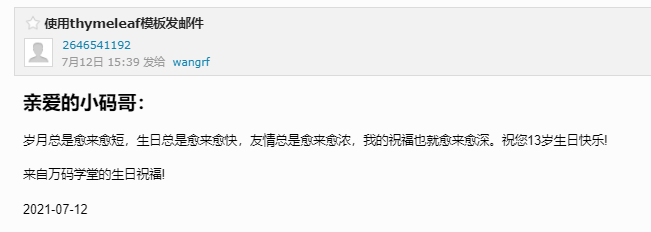
创建emp.html文件放在resources下面的templates文件夹下:
<!DOCTYPE html>
<html lang="en" xmlns:th="http://www.thymeleaf.org">
<head>
    <meta charset="UTF-8">
    <title>生日祝福</title>
</head>
<body>
<h2>亲爱的<span th:text="${emp.name}"></span>:</h2>
<p>岁月总是愈来愈短,生日总是愈来愈快,友情总是愈来愈浓,我的祝福也就愈来愈深。祝您<span th:text="${emp.age}"></span>岁生日快乐!</p>
<p>来自万码学堂的生日祝福!</p>
<p th:text="${today}"></p>
</body>
</html>
1.2.4. 邮件发送类
@SpringBootTest
public class MailTest {
    @Resource
    private MailUtil mailUtil;
    @Resource
    private TemplateEngine templateEngine;
@Resource
    private EmpService empService;
    @Test
    public void testSendThymeleafMail() throws IOException, TemplateException, ParseException {
        DateFormat dateFormat = new SimpleDateFormat("yyyy-MM-dd");
        Emp emp = empService.findTodayBirthdayEmp();
        //准备模型数据 org.thymeleaf.context.Context
        Map<String, Object> model = new HashMap<>();
        model.put("emp",emp);
        model.put("today",dateFormat.format(new Date()));
        Context context = new Context();
        context.setVariables(model);
        //渲染模板生成字符串
        String text = templateEngine.process("emp.html",context);
        System.out.println(text);
        //发送邮件
        mailUtil.sendMail("wangrf@qingsoft.net", "使用thymeleaf模板发邮件", text);

    }

}


0条评论
点击登录参与评论